Difference between revisions of "Collections"
From Spiffy Stores Knowledge Base
| Line 101: | Line 101: | ||
Underneath the collection description, you'll find a section called ''Set your conditions''. In order to create a Super Collection, you will need to add one or more conditions which will determine which products can be added to your new super collection. | Underneath the collection description, you'll find a section called ''Set your conditions''. In order to create a Super Collection, you will need to add one or more conditions which will determine which products can be added to your new super collection. | ||
| + | |||
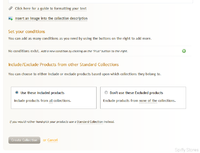
| + | <gallery widths="200px" heights="200px" class="right"> | ||
| + | Image:Super collections3.png|Adding Super Collection Conditions | ||
| + | </gallery> | ||
| + | |||
| + | Click on the green '+' button to start adding new conditions. A new condition line will be added and includes a number of drop-down boxes which will allow you to create the conditions you wish to add. | ||
| + | |||
| + | ==== Super Collection Condition Fields ==== | ||
| + | |||
| + | The first drop-down box specifies the type of condition that will be used to determine if a product is to be included in the collection or not. | ||
| + | |||
| + | The following condition fields are available: | ||
| + | |||
| + | * Product title | ||
| + | * Product type | ||
| + | * Product vendor | ||
| + | * Product archived | ||
| + | * Product featured | ||
| + | * Product price | ||
| + | * Original price | ||
| + | * Weight | ||
| + | * Inventory stock | ||
| + | * Variant's title | ||
| + | * SKU | ||
| + | * Product is tagged with | ||
=== Automatic collections === | === Automatic collections === | ||
Revision as of 13:47, 19 May 2014
Contents
Standard collections
If you want to group together a number of products and to have complete control over which products are included, then a Standard collection is probably what you are looking for. You can pick any number of products to be included in the collection when you create it, and any time you need to make a change you just need to come back to the Collections tab and add or remove whichever products you want.
There is one standard collection called Home Page which is included automatically when you create your store. Most themes, as you may have guessed, include this collection on the Home page of your store. It's easy to include products in the Home Page collection because there is a checkbox shown for exactly that purpose when you are editing your product in the side-bar under the Collections heading.
Here are some other ideas for standard collections that you could put together:
- Staff Favourites: each of your staff members can select a few products that they think are particularly cool to showcase for your customers.
- "Living Room", "Bathroom", "Kitchen": a home furnishing shop could organize its products by room in addition to product type.
- "PS3", "XBox 360", "Wii": if you are selling video games and accessories, then your customers will probably be interested in browsing for only a single system at a time.
Creating a Standard Collection
You can create a new standard collection from the collections tab in your toolbox.
On this page, simple click on the add standard collection button to start creating a new collection.
From there, simply add the Title of your new collection, and add a description of your collection. Once you've created the collection, you'll be able to configure some more options for the collection, such as collection images and specifying the sorting order for the products in your collection.
Once you're ready, click on the Create Collection button to go ahead and create the collection.
Customizing a Standard Collection
Once, you've created your collection, you'll be taken to the overview page for the collection, where you'll be able to add more products, upload some collection images and edit the collection description.
You'll find this page very similar to the product overview page, and you can edit and upload images in exactly the same way.
You can optionally upload images that can be used when your collection page is viewed, but not all themes support collection images by default. Please check your theme settings on the theme editor page to see if your theme has support for collection images.
Underneath the collection description and images, you'll find a section which allows you to quickly add products to your collection.
Can can paginate through a list of your products, and click on any that you want to add to the collection. Use the pagination links underneath the list of products to move backwards and forwards through your products.
You can also enter search terms to limit the number of products that are displayed and to help you find the correct products that you want to add to this collection.
Remember also that a product can belong to one or more collections, so you can organize your products in whatever way best suits your needs.
Organizing a Standard Collection
Once you've added a few products to a collection, you may want to organize them so that they display on your store in a particular fashion.
At the bottom of your collection overview page, you'll find a list of the products that belong to that collection.
You can remove any product from a collection, by clicking on the red '-' button at the end of the product line. This removes a product from the collection, but it doesn't delete the product, so if you change your mind, you can always add it back into the collection.
To the left of the delete button, you 'll find a four-pointed drag symbol which you can use to drag your product up and down in the list to manually change the order in which the products appear in the collection. Just hover your mouse over the symbol until the cursor changes showing you that it's ready to start dragging. Click and hold down your left mouse button and while keeping the mouse button down, drag the product line up or down until you find the right position in the list for the product. Once it's in the right position, just release the mouse button, and the product will drop into its new position in the list.
We can help you organize your collection a bit faster than this, so you don't need to drag and drop every product into the right position.
In the top right-hand corner above the list of products, you'll find a drop-down selection box with a bunch of options that you can use to sort your collection quickly. Just click on one of the options in the box, and your collection will be re-ordered using the desired sorting order.
Even after you've sorted your products in this way, you can still manually drag around the products to finalize their display order. For example, you may want to see your featured products first in the list, but maybe you have a preference for which product should be at the top of the list. Just choose the Featured Products First option in the list, and then when the re-ordering has finished, just drag the product you want to the top of the list.
Previewing your Standard Collection
Finally, once you've added all the products to your collection, you can see what they look like on your store front by clicking on the preview collection button at the top of the side-bar.
Once you've created a collection, you will need to add it to a menu so that your customers can find the collection of products. Just go to the store menus tab and add your collection to one of your menus.
Super Collections
These are collections which are filled with products based on simple rules that you define, but the best part about them is that you never need to worry about updating them with new products: unless you want to change the collection's rules, you can just "set it and forget it".
Super collections can be extremely useful in a variety of different situations. Here are just a few:
- Stocking Stuffers: Product price is less than $20.00.
- Don't delay! Buy now!: Inventory stock is less than 10.
- On Sale: this is a great way of easily putting products on sale and making sure your customers know about it. First, create a super collection with a single criteria, "Original price is greater than 0". Then, for any product you want to put on sale, just change the product price to whatever you want and set a value in the Original price field.
- Build brand and category collections: Some products may belong to brands and categories that are more complex than can be easily dealt with using just Vendor and Type values. Arbitrary tags can be added to products and these can be used to construct super collections.
Creating a Super Collection
You can create a new super collection from the collections tab in your toolbox.
On this page, simple click on the add super collection button to start creating a new collection.
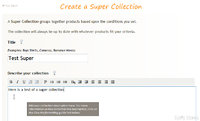
From there, simply add the Title of your new collection, and add a description of your collection. Once you've created the collection, you'll be able to configure some more options for the collection, such as collection images and specifying the sorting order for the products in your collection.
Adding Conditions to a Super Collection
Underneath the collection description, you'll find a section called Set your conditions. In order to create a Super Collection, you will need to add one or more conditions which will determine which products can be added to your new super collection.
Click on the green '+' button to start adding new conditions. A new condition line will be added and includes a number of drop-down boxes which will allow you to create the conditions you wish to add.
Super Collection Condition Fields
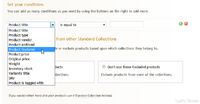
The first drop-down box specifies the type of condition that will be used to determine if a product is to be included in the collection or not.
The following condition fields are available:
- Product title
- Product type
- Product vendor
- Product archived
- Product featured
- Product price
- Original price
- Weight
- Inventory stock
- Variant's title
- SKU
- Product is tagged with
Automatic collections
Automatic collections are created by the Spiffy Store Software for every product type and product vendor that you define. You don't need to do anything extra to create these collections: The store software does it for you. With most "store themes", customers will be able to view these collections by following the type and vendor links shown on the product pages.
Displaying your collections
Your customers need a way of seeing your collections. The easiest way to showcase a collection is to make a link to it in the "Store menus" section of your store's Toolbox. If you ever decide to delete your collection, any links created in this way will automatically be removed as well.
Can I link to a collection from within one of my blogs or pages?
If you have lots of collections, you may run into a problem if you link to all of them from your main menu - your store's interface could easily get very cluttered, especially if your "theme" is not specifically built with this in mind.
One option is to move most collection links into "pages" which themselves are linked from the main menu. See the "Blogs and Pages help" for more information on including links in this way.
What about tags?
As you start adding products to your store, you might wonder about when you should use a tag to describe something and when you should rely on a collection instead. There are no hard and fast rules about this, but there are a few things you should keep in mind.
For any collection which you've made accessible through your store's interface, your customers will be able to see a list of tags they can select in order to filter that list. If all of your shirts are in the "shirts" collection and you've given them all a "shirt" tag, it could be a bit redundant: your customers will find the option to limit their view of your shirts by only looking at the ones that are, in fact...shirts.
Just put yourself in the customer's shoes and think about what kinds of tags would be most helpful in narrowing your search when you arrive at a collection. Your choice of tags will guide your choice of visible collections, and vice versa.
Re-ordering products in a collection
There are several options for the display order of products in your store. By default, products are displayed in the collection in the order that they are added to a collection. This can be changed by following the instructions below:
- Log in to your store's Toolbox, and click on the "collections" tab.
- Click on the name of the collection that you want to re-order
- Scroll down to the bottom of the page, where you will see the following options next to the text "Reorder this collection";
- Featured Products First
- Alphabetically: A-Z
- Alphabetically: Z-A
- By Date Created: Most Recent First
- By Date Created: Oldest First
- By Date Updated: Most Recent First
- By Date Updated: Oldest First
- By Price: Most Expensive First
- By Price: Least Expensive First
- Random
The descriptions above are fairly self-explanatory. When you have selected an option, you can also then opt to change this order by using the built-in drag and drop to re-order your products.
Collection Images
In December 2013, we introduced collection images, where you can upload an image for your collection. This functionality is theme dependent, and themes show your collection images in different ways. Some use the collection images as a slideshow, and others only use them when displaying a list of your collections.
Collection images are currently supported by the Minimal and Vintage themes only. Other themes are currently being updated to use collection images. The Dream theme will be updated in early April with support for collection images, and other themes will be re-released with this feature on an ongoing basis until all are updated.


